เกี่ยวกับการติดเชื้อนี้
“Windows Security Notification” Fake Alertsเป็นส่วนใหญ่มักเกิดจากแอดแวร์ การติดเชื้อค่อนข้างน้อย ถ้าคุณได้รับป๊อปอัพครั้ง ก็ไม่มีอะไรต้องกังวล เพราะคุณอาจจะเพียงได้สุ่มเปลี่ยนเส้นทางไปยังไซต์ที่น่าสงสัย อย่างไรก็ตาม ถ้าปรากฏหน้าต่างแบบผุดขึ้นอย่างต่อเนื่อง คุณอาจจะแอด. 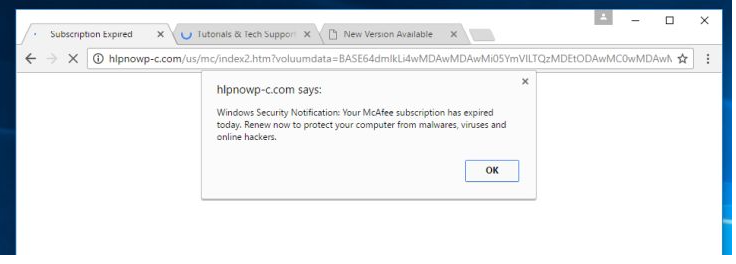
Offers
ดาวน์โหลดเครื่องมือการเอาออกto scan for “Windows Security Notification” Fake AlertsUse our recommended removal tool to scan for “Windows Security Notification” Fake Alerts. Trial version of provides detection of computer threats like “Windows Security Notification” Fake Alerts and assists in its removal for FREE. You can delete detected registry entries, files and processes yourself or purchase a full version.
More information about SpyWarrior and Uninstall Instructions. Please review SpyWarrior EULA and Privacy Policy. SpyWarrior scanner is free. If it detects a malware, purchase its full version to remove it.

WiperSoft รีวิวรายละเอียด WiperSoftเป็นเครื่องมือรักษาความปลอดภัยที่มีความปลอดภ� ...
ดาวน์โหลด|เพิ่มเติมไวรัสคือ MacKeeperMacKeeper เป็นไวรัสไม่ ไม่ใช่เรื่อง หลอกลวง ในขณะที่มีความคิดเห็ ...
ดาวน์โหลด|เพิ่มเติมในขณะที่ผู้สร้างมัล MalwareBytes ไม่ได้ในธุรกิจนี้นาน พวกเขาได้ค่ามัน ด้วยวิธ� ...
ดาวน์โหลด|เพิ่มเติม

ติดเชื้อต่าง ๆ เหล่านี้มักจะลงในฟรีแวร์เป็นข้อเสนอพิเศษ และเนื่องจากผู้ใช้จำนวนมากไม่ได้สังเกตเห็นพวกเขา พวกเขาได้รับอนุญาตให้ติดตั้ง การแจ้งเตือนอ้าง McAfee ที่หมดอายุสมาชิกและว่า การปกป้องคอมพิวเตอร์ของคุณจากมัลแวร์ คุณต้องปรับปรุง ถ้าคุณไม่ได้ใช้ McAfee ชัดเจนการแจ้งเตือนจะปลอม และถ้าคุณจะ การแจ้งเตือนปลอมยังคงเนื่องจากบริษัทฯ จะไม่เตือนคุณเกี่ยวกับการต่ออายุสมาชิกทางนี้ ถ้าคุณเพียงแค่เอา “Windows Security Notification” Fake Alerts หน้าต่างแบบผุดขึ้นควรหยุดปรากฏ
วิธีทำงาน
ฟรีแวร์เป็นข้อเสนอพิเศษถูกแอดแวร์ และถ้าคุณไม่ต้องการติดตั้ง คุณต้องยกเลิกเลือก ครั้งถัดไปที่คุณติดตั้งฟรีแวร์ เลือกการตั้งค่าขั้นสูงหรือแบบกำหนดเอง การตั้งค่าที่จะแสดง ถ้ามีการเพิ่มอะไร และ ถ้ามี คุณจะสามารถยกเลิกเลือก ตรวจสอบให้แน่ใจว่า คุณยกเลิกเลือกกล่องทั้งหมดเนื่องจากถ้าโปรแกรมไม่ได้ถูกบอกคุณเกี่ยวกับการติดตั้ง มันไม่ควรอนุญาตการติดตั้ง ในที่สุดคุณจะต้องกำจัดสินค้าเพิ่มหากพวกเขาติดตั้งอย่างไรก็ตาม และมันง่ายมากที่จะยกเลิกกล่องกี่กว่ามันจะเป็นการลบแอดแวร์ “Windows Security Notification” Fake Alerts หรือสิ่งที่คล้ายกันในภายหลัง
หน้าต่างแบบผุดขึ้นจะเริ่มปรากฏขึ้นแบบสุ่มเมื่อคุณกำลังเรียกดูอินเทอร์เน็ต และแอบจะแจ้งให้ทราบว่า การสมัครของ McAfee จะล้าสมัย ป๊อปอัพเหล่านี้ส่วนใหญ่จะปรากฏใน Google Chrome แต่เบราว์เซอร์อื่น ๆ อาจได้รับผลกระทบเช่นกัน คุณสามารถให้ปิดพวกเขา แต่พวกเขาจะปรากฏอย่างต่อเนื่อง คุณจะต้องถอนการติดตั้งแอดแวร์ “Windows Security Notification” Fake Alerts เพื่อให้หยุด สิ่งที่คุณทำ ทำไม่ดาวน์โหลด ‘ปรับปรุง’ นี้มีคุณ เพราะคุณจะติดเชื้อคอมพิวเตอร์ของคุณ ด้วยมัลแวร์เท่านั้น เหมือนเรากล่าวก่อน บริษัทถูกต้องตามกฎหมายไม่เคยจะแจ้งเกี่ยวกับการต่ออายุด้วยวิธีนี้ แทน จะใช้อีเมล์ หรือการแจ้งให้ทราบจะปรากฏในตัวโปรแกรมเอง เมื่อคุณพบข้อความแจ้งเตือนต่าง ๆ เหล่านี้ รู้ว่า พวกเขาจะปลอม และถ้าคุณต้องปรับปรุงบางสิ่งบางอย่าง ให้ใช้เว็บไซต์ที่ถูกต้องทางการ ในเวลาเฉลี่ย ให้แน่ใจว่า คุณเอา “Windows Security Notification” Fake Alerts
กำจัด “Windows Security Notification” Fake Alerts
ถ้าคุณมีซอฟต์แวร์ป้องกันสปายแวร์ คุณสามารถใช้มันเพื่อลบ “Windows Security Notification” Fake Alerts กำจัด “Windows Security Notification” Fake Alerts อัตโนมัติอาจเป็นตัวเลือกที่ง่ายที่สุดเนื่องจากโปรแกรมจะทำทุกอย่างให้คุณ ถ้าคุณต้องการถอนการติดตั้ง “Windows Security Notification” Fake Alerts ด้วยตนเอง คุณสามารถใช้ด้านล่างให้คำแนะนำของคุณ
Offers
ดาวน์โหลดเครื่องมือการเอาออกto scan for “Windows Security Notification” Fake AlertsUse our recommended removal tool to scan for “Windows Security Notification” Fake Alerts. Trial version of provides detection of computer threats like “Windows Security Notification” Fake Alerts and assists in its removal for FREE. You can delete detected registry entries, files and processes yourself or purchase a full version.
More information about SpyWarrior and Uninstall Instructions. Please review SpyWarrior EULA and Privacy Policy. SpyWarrior scanner is free. If it detects a malware, purchase its full version to remove it.
WiperSoft รีวิวรายละเอียด WiperSoftเป็นเครื่องมือรักษาความปลอดภัยที่มีความปลอดภ� ...
ดาวน์โหลด|เพิ่มเติมไวรัสคือ MacKeeperMacKeeper เป็นไวรัสไม่ ไม่ใช่เรื่อง หลอกลวง ในขณะที่มีความคิดเห็ ...
ดาวน์โหลด|เพิ่มเติมในขณะที่ผู้สร้างมัล MalwareBytes ไม่ได้ในธุรกิจนี้นาน พวกเขาได้ค่ามัน ด้วยวิธ� ...
ดาวน์โหลด|เพิ่มเติม
Quick Menu
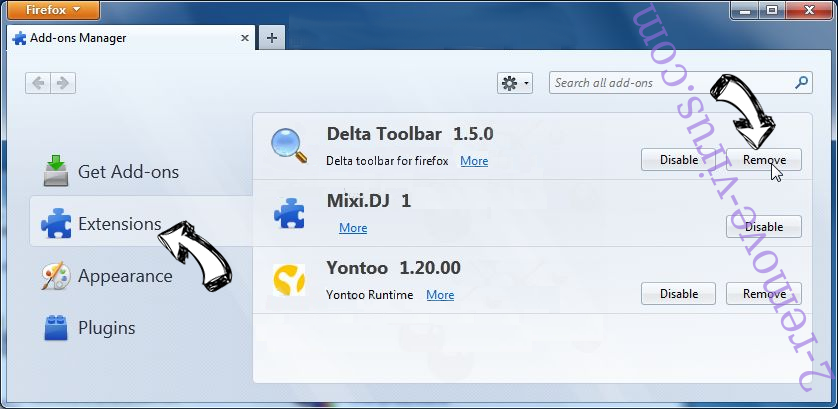
ขั้นตอนที่1 ได้ ถอนการติดตั้ง “Windows Security Notification” Fake Alerts และโปรแกรมที่เกี่ยวข้อง
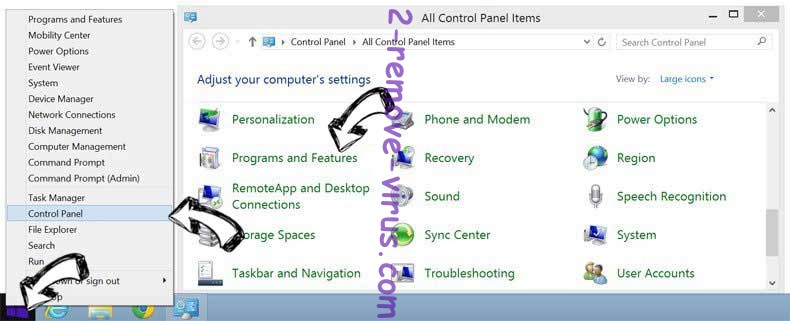
เอา “Windows Security Notification” Fake Alerts ออกจาก Windows 8
คลิกขวาในมุมซ้ายด้านล่างของหน้าจอ เมื่อแสดงด่วนเข้าเมนู เลือกแผงควบคุมเลือกโปรแกรม และคุณลักษณะ และเลือกถอนการติดตั้งซอฟต์แวร์
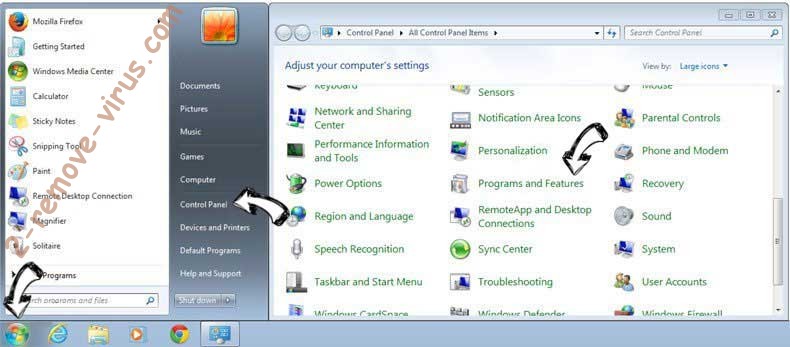
ถอนการติดตั้ง “Windows Security Notification” Fake Alerts ออกจาก Windows 7
คลิก Start → Control Panel → Programs and Features → Uninstall a program.
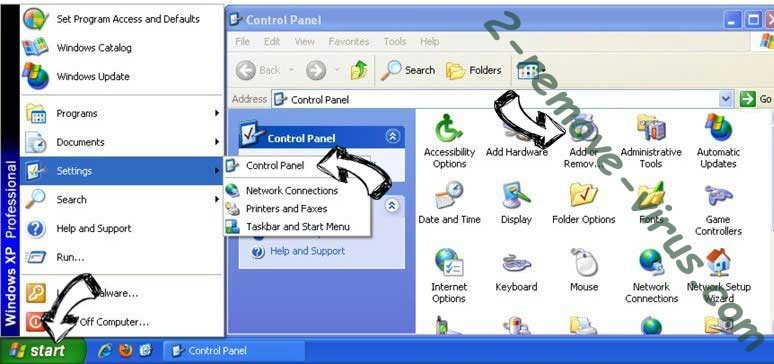
ลบ “Windows Security Notification” Fake Alerts จาก Windows XP
คลิก Start → Settings → Control Panel. Yerini öğrenmek ve tıkırtı → Add or Remove Programs.
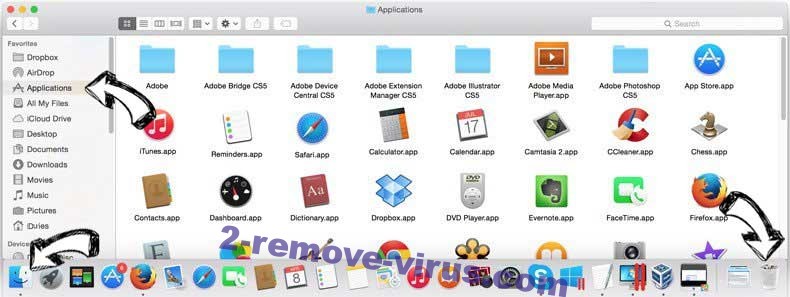
เอา “Windows Security Notification” Fake Alerts ออกจาก Mac OS X
คลิกที่ปุ่มไปที่ด้านบนซ้ายของหน้าจอและโปรแกรมประยุกต์ที่เลือก เลือกโฟลเดอร์ของโปรแกรมประยุกต์ และค้นหา “Windows Security Notification” Fake Alerts หรือซอฟต์แวร์น่าสงสัยอื่น ๆ ตอนนี้ คลิกขวาบนทุกส่วนของรายการดังกล่าวและเลือกย้ายไปถังขยะ แล้วคลิกที่ไอคอนถังขยะ และถังขยะว่างเปล่าที่เลือก
ขั้นตอนที่2 ได้ ลบ “Windows Security Notification” Fake Alerts จากเบราว์เซอร์ของคุณ
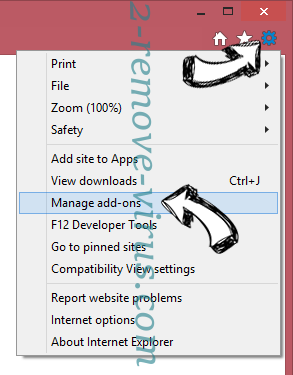
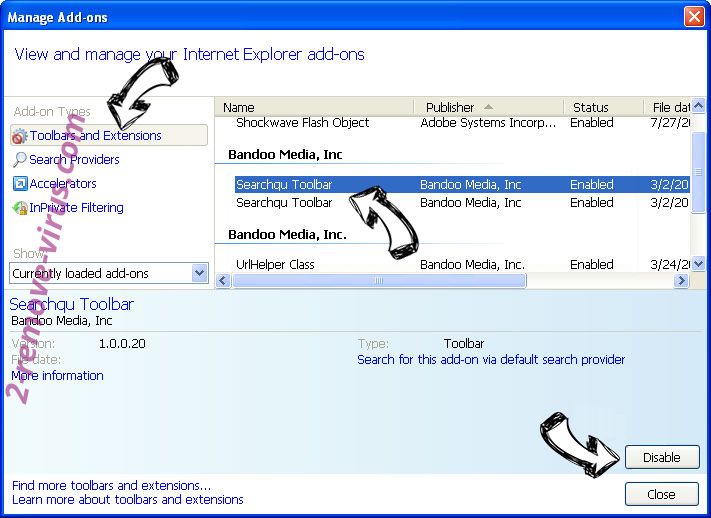
ส่วนขยายที่ไม่พึงประสงค์จาก Internet Explorer จบการทำงาน
- แตะไอคอนเกียร์ และไป'จัดการ add-on
- เลือกแถบเครื่องมือและโปรแกรมเสริม และกำจัดรายการที่น่าสงสัยทั้งหมด (ไม่ใช่ Microsoft, Yahoo, Google, Oracle หรือ Adobe)
- ออกจากหน้าต่าง
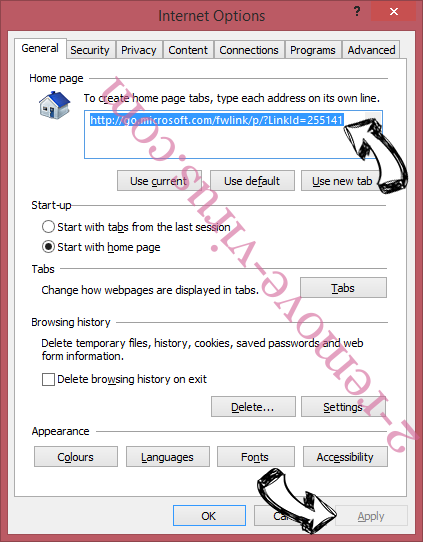
เปลี่ยนหน้าแรกของ Internet Explorer ถ้ามีการเปลี่ยนแปลง โดยไวรัส:
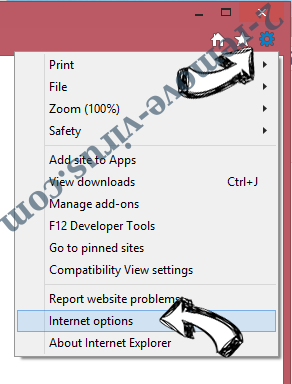
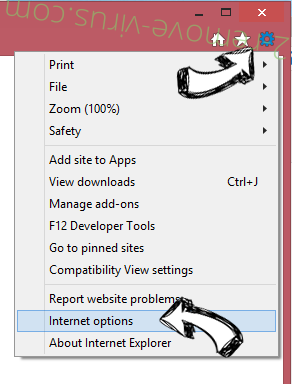
- แตะไอคอนเกียร์ (เมนู) ที่มุมบนขวาของเบราว์เซอร์ และคลิกตัวเลือกอินเทอร์เน็ต
- โดยทั่วไปแท็บลบ URL ที่เป็นอันตราย และป้อนชื่อโดเมนที่กว่า ใช้กดเพื่อบันทึกการเปลี่ยนแปลง
การตั้งค่าเบราว์เซอร์ของคุณ
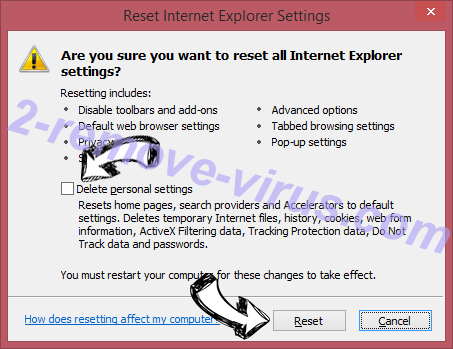
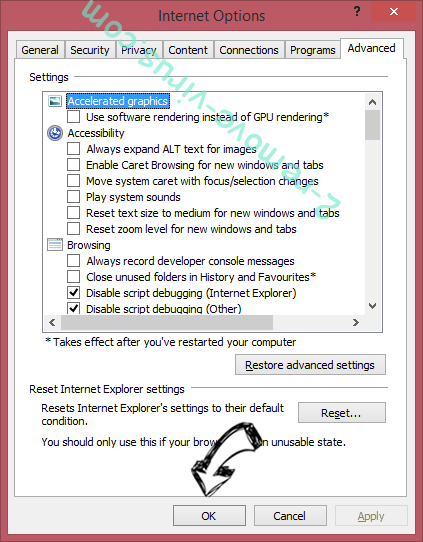
- คลิกที่ไอคอนเกียร์ และย้ายไปตัวเลือกอินเทอร์เน็ต
- เปิดแท็บขั้นสูง แล้วกดใหม่
- เลือกลบการตั้งค่าส่วนบุคคล และรับรีเซ็ตหนึ่งเวลาขึ้น
- เคาะปิด และออกจากเบราว์เซอร์ของคุณ
- ถ้าคุณไม่สามารถรีเซ็ตเบราว์เซอร์ของคุณ ใช้มัลมีชื่อเสียง และสแกนคอมพิวเตอร์ของคุณทั้งหมดด้วย

ลบ “Windows Security Notification” Fake Alerts จากกูเกิลโครม
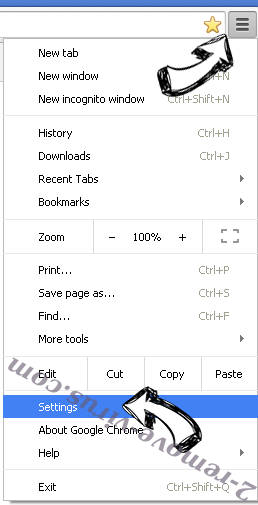
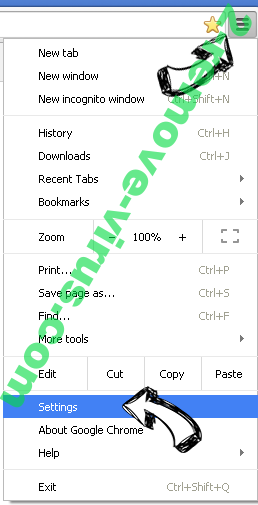
- เข้าถึงเมนู (มุมบนขวาของหน้าต่าง) และเลือกการตั้งค่า
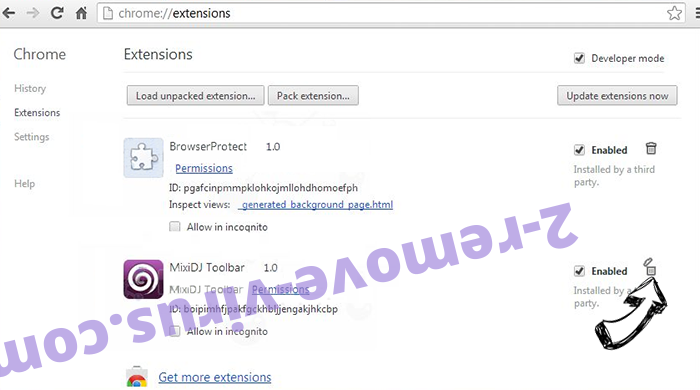
- เลือกส่วนขยาย
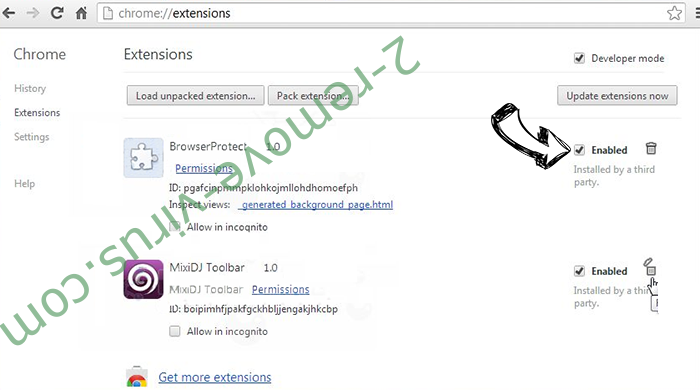
- กำจัดส่วนขยายน่าสงสัยจากรายการ โดยการคลิกที่ถังขยะติดกับพวกเขา
- ถ้าคุณไม่แน่ใจว่าส่วนขยายที่จะเอาออก คุณสามารถปิดใช้งานนั้นชั่วคราว

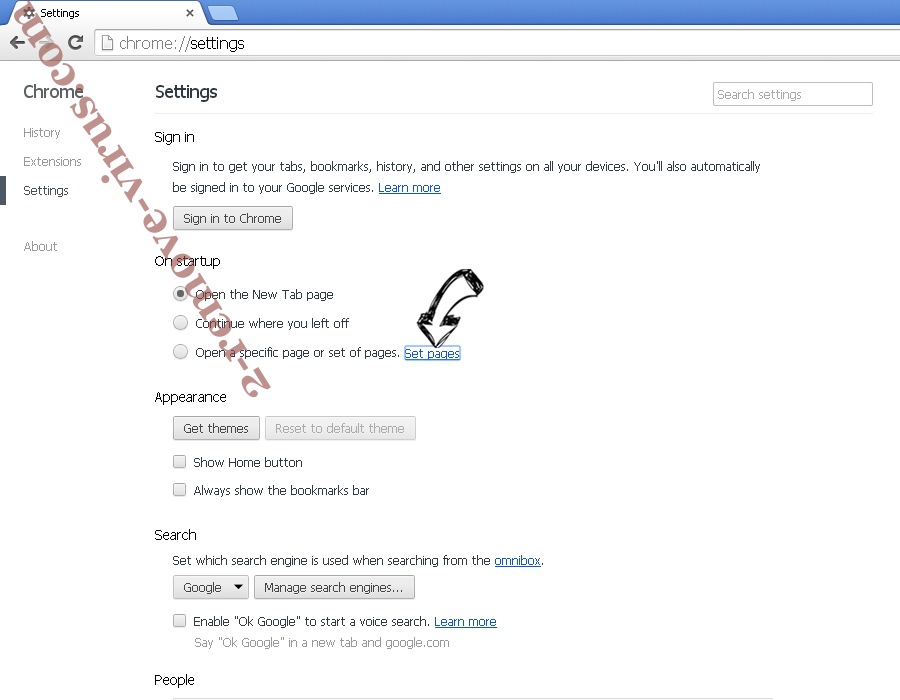
ตั้งค่า Google Chrome homepage และเริ่มต้นโปรแกรมค้นหาถ้าเป็นนักจี้ โดยไวรัส
- กดบนไอคอนเมนู และคลิกการตั้งค่า
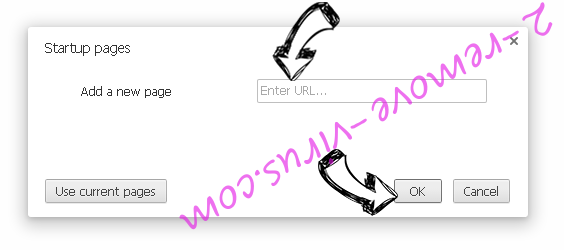
- ค้นหา "เปิดหน้าใดหน้าหนึ่ง" หรือ "ตั้งหน้า" ภายใต้ "ในการเริ่มต้นระบบ" ตัวเลือก และคลิกตั้งค่าหน้า
- ในหน้าต่างอื่นเอาไซต์ค้นหาที่เป็นอันตรายออก และระบุวันที่คุณต้องการใช้เป็นโฮมเพจของคุณ
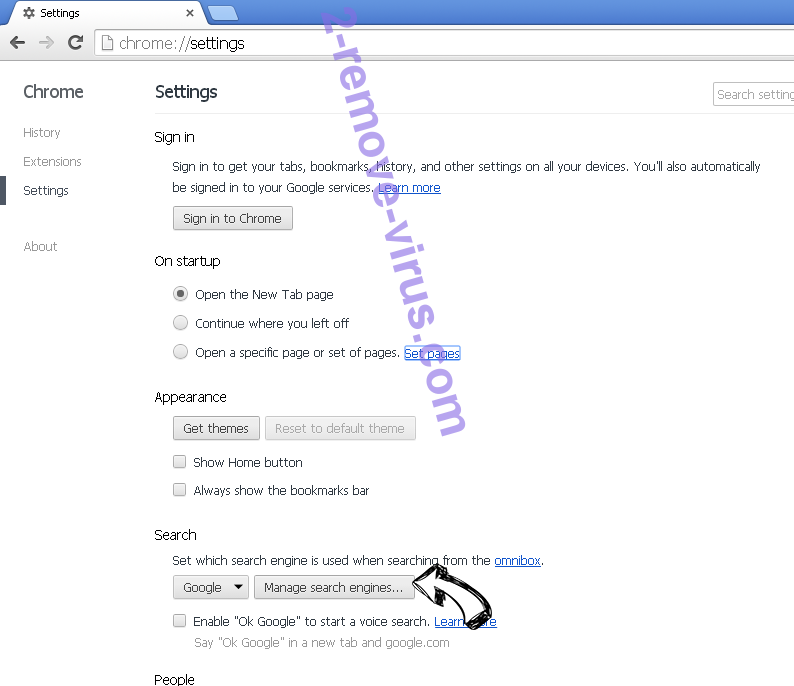
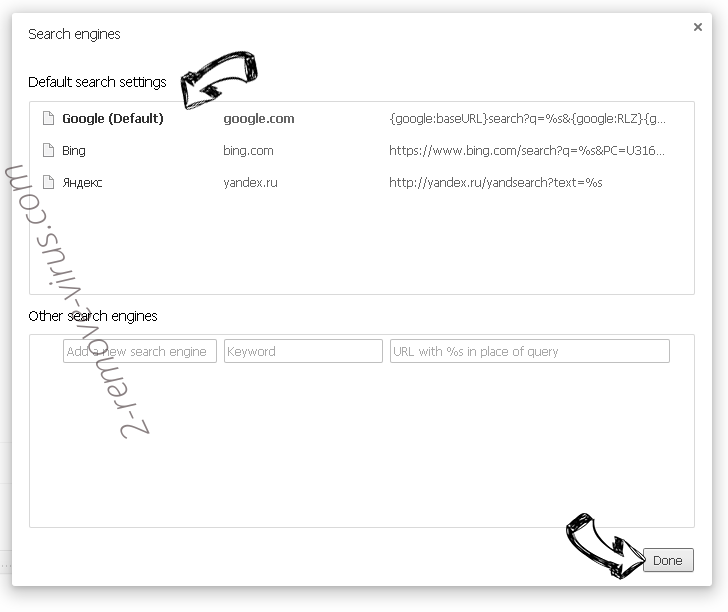
- ภายใต้หัวข้อค้นหาเลือกเครื่องมือค้นหาจัดการ เมื่ออยู่ใน Search Engine..., เอาเว็บไซต์ค้นหาอันตราย คุณควรปล่อยให้ Google หรือชื่อที่ต้องการค้นหาของคุณเท่านั้น
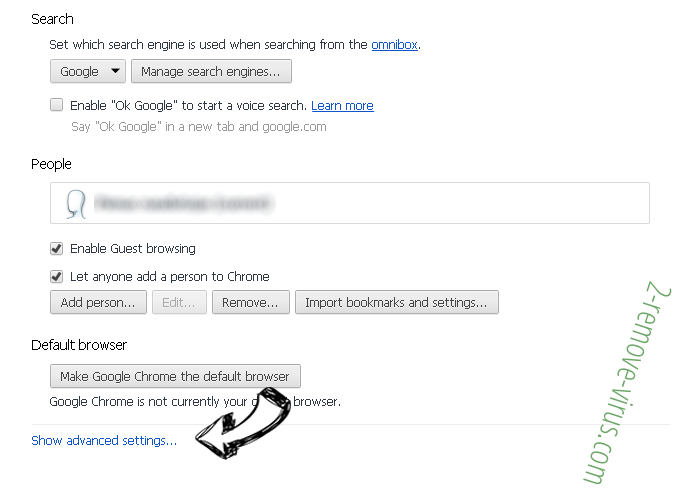
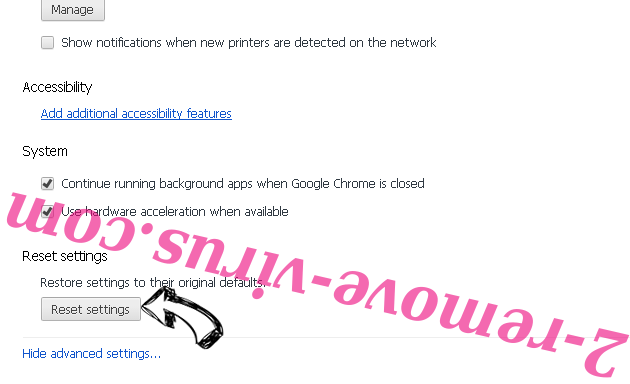
การตั้งค่าเบราว์เซอร์ของคุณ
- ถ้าเบราว์เซอร์ยังคงไม่ทำงานตามที่คุณต้องการ คุณสามารถรีเซ็ตการตั้งค่า
- เปิดเมนู และไปที่การตั้งค่า
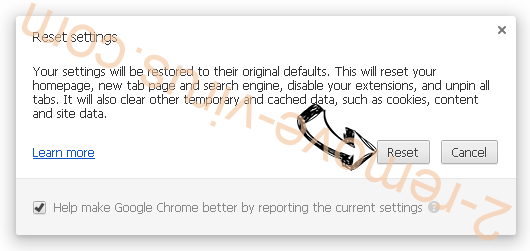
- กดปุ่ม Reset ที่ส่วนท้ายของหน้า
- เคาะปุ่มตั้งค่าใหม่อีกครั้งในกล่องยืนยัน
- ถ้าคุณไม่สามารถรีเซ็ตการตั้งค่า ซื้อมัลถูกต้องตามกฎหมาย และสแกนพีซีของคุณ
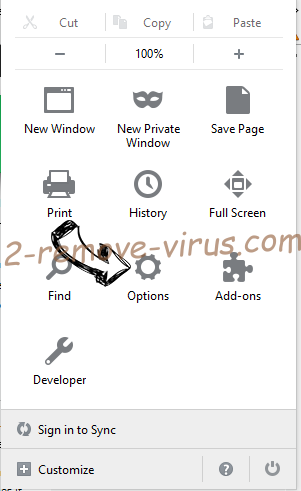
เอา “Windows Security Notification” Fake Alerts ออกจาก Mozilla Firefox
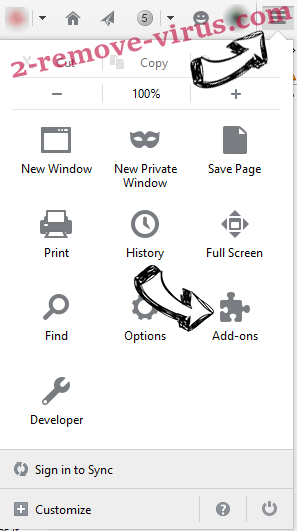
- ที่มุมขวาบนของหน้าจอ กดปุ่ม menu และเลือกโปรแกรม Add-on (หรือเคาะ Ctrl + Shift + A พร้อมกัน)
- ย้ายไปยังรายการส่วนขยายและโปรแกรม Add-on และถอนการติดตั้งของรายการทั้งหมดที่น่าสงสัย และไม่รู้จัก
เปลี่ยนโฮมเพจของ Mozilla Firefox ถ้ามันถูกเปลี่ยนแปลง โดยไวรัส:
- เคาะบนเมนู (มุมบนขวา) เลือกตัวเลือก
- บนทั่วไปแท็บลบ URL ที่เป็นอันตราย และป้อนเว็บไซต์กว่า หรือต้องการคืนค่าเริ่มต้น
- กดตกลงเพื่อบันทึกการเปลี่ยนแปลงเหล่านี้
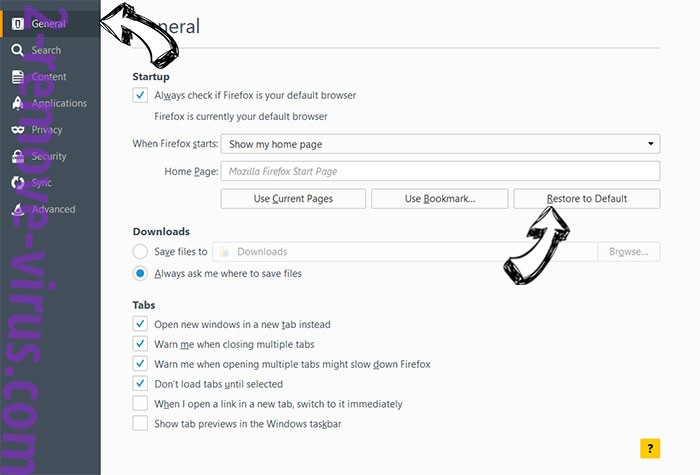
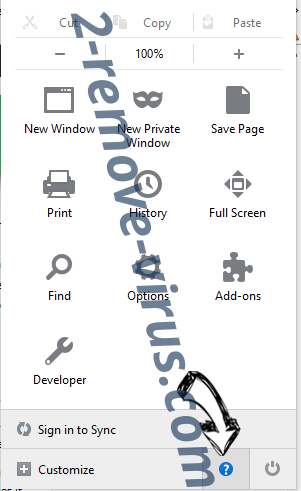
การตั้งค่าเบราว์เซอร์ของคุณ
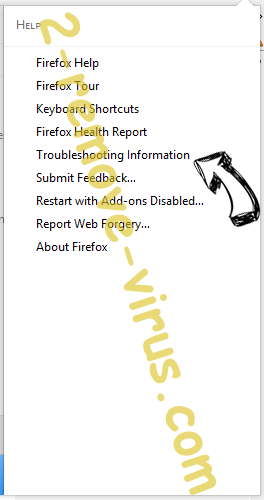
- เปิดเมนู และแท็บปุ่มช่วยเหลือ
- เลือกข้อมูลการแก้ไขปัญหา
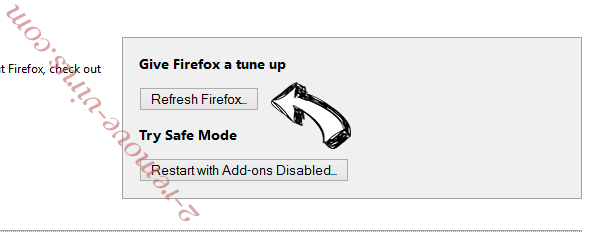
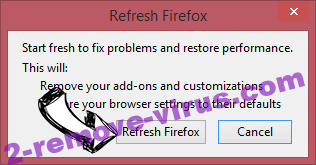
- กดรีเฟรช Firefox
- ในกล่องยืนยัน คลิก Firefox รีเฟรชอีกครั้ง
- ถ้าคุณไม่สามารถรีเซ็ต Mozilla Firefox สแกนคอมพิวเตอร์ของคุณทั้งหมดกับมัลเป็นที่น่าเชื่อถือ
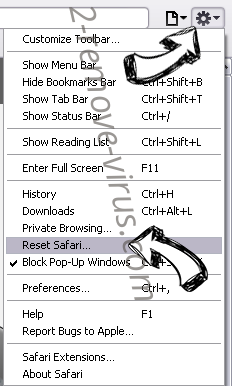
ถอนการติดตั้ง “Windows Security Notification” Fake Alerts จากซาฟารี (Mac OS X)
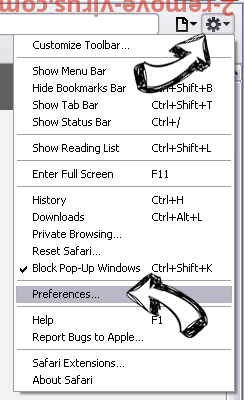
- เข้าถึงเมนู
- เลือกการกำหนดลักษณะ
- ไปแท็บส่วนขยาย
- เคาะปุ่มถอนการติดตั้งถัดจาก “Windows Security Notification” Fake Alerts ระวัง และกำจัดของรายการทั้งหมดอื่น ๆ ไม่รู้จักเป็นอย่างดี ถ้าคุณไม่แน่ใจว่าส่วนขยายเป็นเชื่อถือได้ หรือไม่ เพียงแค่ยกเลิกเลือกกล่องเปิดใช้งานเพื่อปิดใช้งานชั่วคราว
- เริ่มซาฟารี

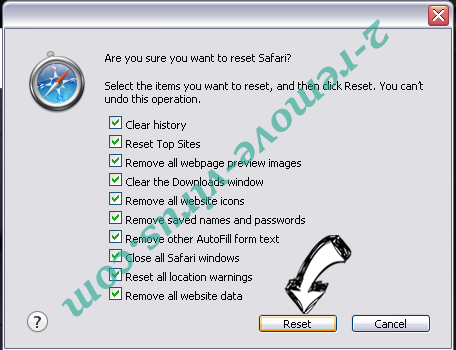
การตั้งค่าเบราว์เซอร์ของคุณ
- แตะไอคอนเมนู และเลือกตั้งซาฟารี
- เลือกตัวเลือกที่คุณต้องการใหม่ (มักจะทั้งหมดที่เลือกไว้แล้ว) และกดใหม่
- ถ้าคุณไม่สามารถรีเซ็ตเบราว์เซอร์ สแกนพีซีของคุณทั้งหมด ด้วยซอฟต์แวร์การเอาจริง
Site Disclaimer
2-remove-virus.com is not sponsored, owned, affiliated, or linked to malware developers or distributors that are referenced in this article. The article does not promote or endorse any type of malware. We aim at providing useful information that will help computer users to detect and eliminate the unwanted malicious programs from their computers. This can be done manually by following the instructions presented in the article or automatically by implementing the suggested anti-malware tools.
The article is only meant to be used for educational purposes. If you follow the instructions given in the article, you agree to be contracted by the disclaimer. We do not guarantee that the artcile will present you with a solution that removes the malign threats completely. Malware changes constantly, which is why, in some cases, it may be difficult to clean the computer fully by using only the manual removal instructions.